Assembling a hard hat is simple. Follow a few steps to ensure safety.
Hard hats are essential in many workplaces. They protect your head from injuries. Knowing how to assemble them correctly is crucial. In this guide, we will walk you through the process. You’ll learn to put together a hard hat step by step.
This will ensure it fits well and stays secure. Whether you are new to using hard hats or need a quick refresher, this guide will help you. Read on to ensure you are protected on the job.
Introduction To Hard Hats
Hard hats are essential in many workplaces. They protect your head from injuries. This guide will help you understand hard hats and their importance.
Importance Of Safety
Safety should be your top priority at work. Hard hats protect you from falling objects. They also shield you from bumps and electrical shocks. Wearing a hard hat can save your life. It reduces the risk of head injuries.
Common Uses
Hard hats are used in various industries. Construction workers wear them daily. Electricians use them to stay safe. They are also common in manufacturing plants. Even miners and loggers depend on hard hats. They ensure safety in risky environments.
Types Of Hard Hats
Understanding the different types of hard hats is essential for safety at work. Not all hard hats are created equal. Each type serves a unique purpose and offers specific protection. Knowing the right type of hard hat can help prevent injuries and accidents. Let’s explore the types of hard hats, focusing on their classes and categories, as well as materials and durability.
Classes And Categories
Hard hats are classified into different classes based on the level of protection they offer. There are three main classes: Class G, Class E, and Class C.
Class G (General): These hard hats provide impact protection. They also offer limited voltage protection up to 2,200 volts.
Class E (Electrical): These hard hats offer impact protection and high voltage protection. They protect up to 20,000 volts.
Class C (Conductive): These hard hats provide impact protection but do not offer electrical protection. They are typically made from aluminum.
Materials And Durability
Hard hats are made from various materials. The most common materials include high-density polyethylene (HDPE), polycarbonate, and fiberglass.
HDPE: These hard hats are lightweight and offer good impact resistance. They are often used in construction and other heavy-duty jobs.
Polycarbonate: These hard hats are stronger and more durable. They offer better protection against high impacts and are used in more hazardous environments.
Fiberglass: These hard hats are very strong and heat-resistant. They are ideal for jobs involving high temperatures or where fire hazards are present.
Choosing the right material impacts the durability and effectiveness of the hard hat. Make sure to select a hard hat that suits your specific job requirements. This ensures maximum protection and safety.
Components Of A Hard Hat
Understanding the components of a hard hat is crucial for proper assembly. Each part plays a vital role in protecting your head. Let’s explore these components in detail.
Shell And Suspension
The shell is the hard outer part of the hard hat. It protects against impacts and penetration from falling objects. The shell is made from durable materials like polyethylene or fiberglass.
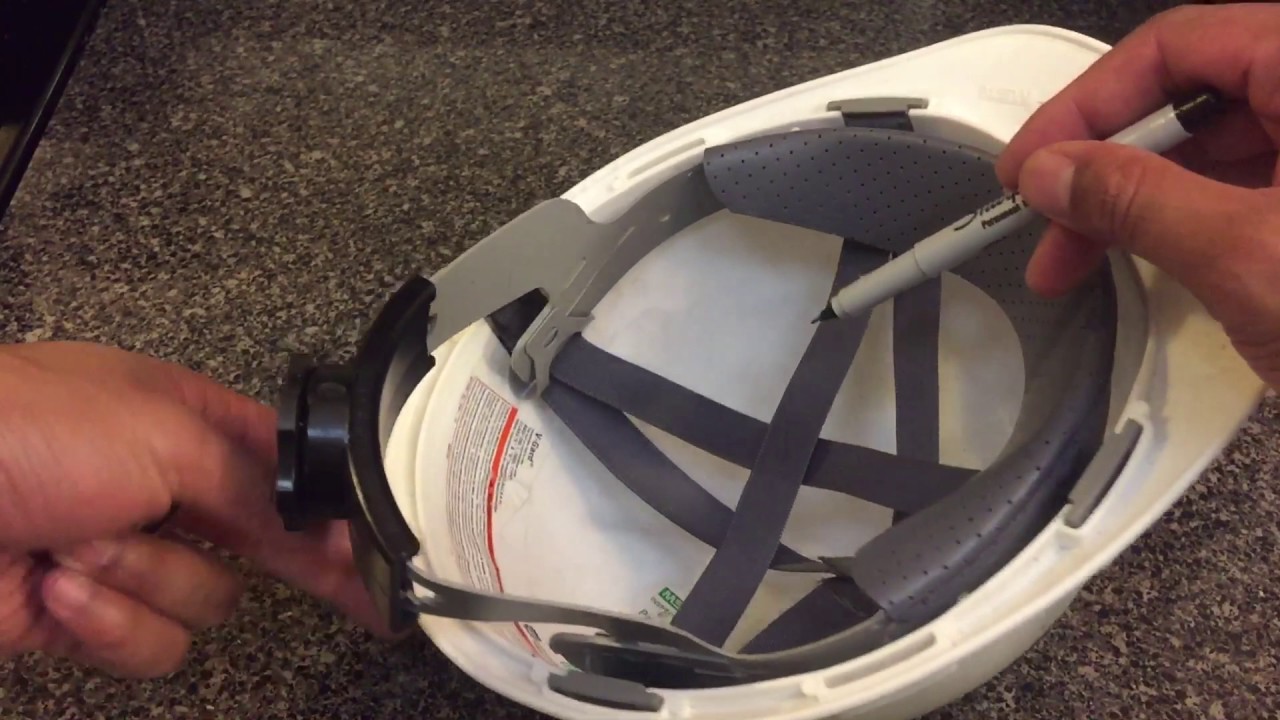
Inside the shell, the suspension system fits snugly around your head. The suspension absorbs and distributes the force of impacts. It consists of straps, bands, and padding. Proper adjustment of the suspension ensures a comfortable and secure fit.
Additional Accessories
Hard hats can include additional accessories for extra protection and convenience. Face shields protect your face from debris and sparks. Ear muffs or plugs can be attached to protect your hearing in noisy environments.
Some hard hats come with chin straps for extra stability. These straps keep the hat in place, even during intense activity. Ventilation holes are another useful feature. They allow air to circulate and keep your head cool.
Various attachments are available for specific needs. For example, headlamps for working in low light conditions. Sweatbands can be added for extra comfort.

Credit: m.youtube.com
Pre-assembly Checks
Before you start assembling your hard hat, it’s crucial to perform some pre-assembly checks. These checks ensure your hard hat will provide the necessary protection. Proper pre-assembly checks help avoid any safety risks. Follow these steps to make sure everything is ready.
Inspecting Components
First, take out all the components from the packaging. Lay them out on a clean surface. Check each part for any visible damage. Look for cracks, dents, or other signs of wear. Pay close attention to the helmet shell and the suspension system. A damaged component can compromise safety. Replace any faulty parts immediately.
Ensuring Compatibility
Next, ensure all the components are compatible. Verify that the suspension system matches the helmet shell. Different brands or models may not fit together. Check the manufacturer’s instructions for compatibility details. Using incompatible parts can reduce protection. Always use parts from the same manufacturer. This step is crucial for your safety.
Assembling The Shell
Assembling a hard hat shell is a straightforward process. It ensures your safety on-site. A hard hat consists of a shell, suspension, and chin strap. Follow these steps to assemble it correctly.
Attaching The Suspension
First, find the suspension system. It usually comes with the hard hat. Locate the slots inside the shell. These slots secure the suspension. Insert the suspension tabs into the slots. Push until you hear a click. This ensures they are firmly in place. Check all tabs to confirm a secure fit. The suspension should not move. Adjust the height of the suspension if needed. This ensures a comfortable fit.
Securing The Chin Strap
Next, locate the chin strap. It keeps the hard hat stable. Find the attachment points on the shell. Clip the chin strap onto these points. Ensure both sides are secure. Adjust the length of the strap. It should fit snugly under your chin. This prevents the hard hat from falling off. Test the fit by shaking your head. The hard hat should stay in place.

Credit: www.amazon.com
Adjusting For Fit
Wearing a hard hat that fits properly is crucial for safety. A well-fitted hard hat stays in place, providing the best protection. Let’s break down the steps to ensure your hard hat fits well.
Adjusting The Suspension
The suspension system is inside the hard hat. It cradles your head. Start by loosening the suspension. Place the hard hat on your head. Tighten the suspension slowly. Ensure it fits snugly but isn’t too tight. You should feel comfortable. The hard hat should not move when you shake your head.
Fitting The Chin Strap
The chin strap keeps the hard hat secure. Fasten the chin strap under your chin. Adjust the length until it feels snug. It should not be too tight. You should be able to open your mouth comfortably. The hard hat should stay in place even if you bend over.
Maintenance Tips
Maintenance of a hard hat is crucial for safety. Proper care ensures it provides protection when needed. Regular inspections, cleaning, and storage can extend its life. Follow these tips to keep your hard hat in good condition.
Regular Inspections
Check your hard hat before each use. Look for cracks, dents, or damage. Inspect the suspension system as well. Ensure it fits securely and is not worn out. Replace any damaged parts immediately.
Cleaning And Storage
Clean your hard hat regularly with mild soap and water. Avoid using harsh chemicals. They can weaken the material. Dry it completely before storing. Store your hard hat in a cool, dry place. Keep it away from direct sunlight and extreme temperatures. This prevents the material from degrading. A well-maintained hard hat lasts longer and offers better protection.
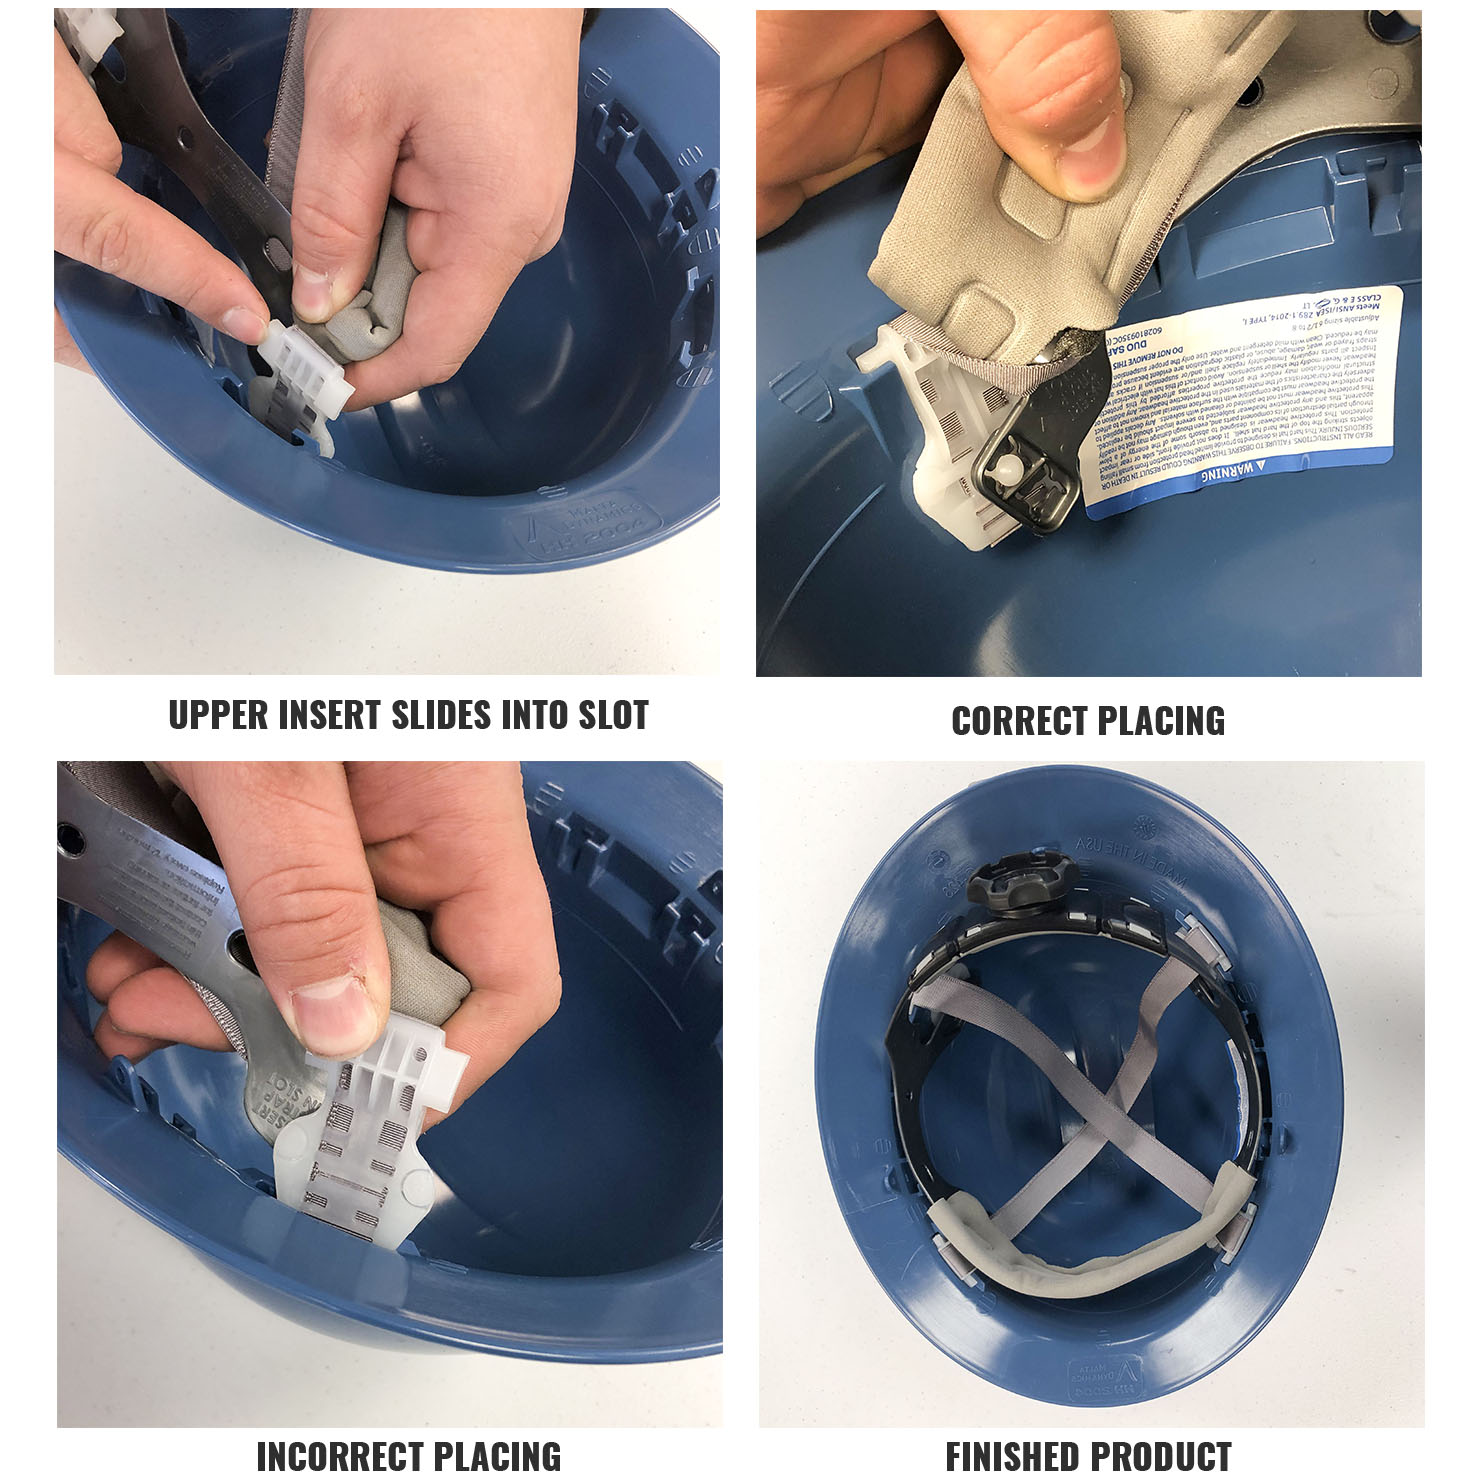
Credit: maltadynamics.com
Troubleshooting Common Issues
Assembling a hard hat is usually straightforward. But, sometimes you may face issues. Below, we will address common problems and solutions. This will help you ensure your hard hat fits well and stays secure.
Handling Discomfort
Wearing a hard hat for long periods can cause discomfort. Here are some tips to make it more comfortable:
- Adjust the suspension: Ensure the suspension is correctly aligned. This can help distribute weight evenly.
- Check for padding: Some hard hats have extra padding. Use it for added comfort.
- Proper fit: Make sure the hard hat fits snugly. It should not be too tight or too loose.
Fixing Loose Parts
Loose parts can make the hard hat unstable. Follow these steps to fix loose parts:
- Inspect the suspension: Check if the suspension is attached properly. Reattach if needed.
- Tighten the headband: Use the adjustment mechanism to tighten the headband.
- Replace worn parts: If parts are worn out, replace them. This ensures the hard hat remains secure.
By following these tips, you can troubleshoot and resolve common issues with your hard hat. Ensuring a comfortable and secure fit is crucial for safety.
Frequently Asked Questions
What Tools Are Needed To Assemble A Hard Hat?
To assemble a hard hat, you typically need just your hands. No special tools are required.
How Do You Attach The Suspension To The Hard Hat?
Align the suspension with the hat’s slots and press until it clicks into place securely.
Can I Adjust The Fit Of My Hard Hat?
Yes, you can adjust the fit by tightening or loosening the suspension’s knob or straps.
How Often Should I Inspect My Hard Hat?
Inspect your hard hat before each use for any cracks, dents, or wear and tear.
Conclusion
Assembling a hard hat is simple and crucial for safety. Follow the steps carefully. Ensure every part fits securely. Proper fit enhances protection and comfort. Check your hard hat regularly for wear and tear. A well-assembled hard hat prevents injuries.
Stay safe on the job by keeping your gear in top condition. Remember, safety starts with the right equipment. Happy assembling!
