Building scaffolding is crucial for construction work. It ensures safety and efficiency.
Understanding how to make scaffolding is essential for both professionals and DIY enthusiasts. It provides a stable platform for workers and tools at various heights. This guide will walk you through the steps to create sturdy scaffolding. You’ll learn about the materials needed and safety measures to consider.
Proper scaffolding can prevent accidents and save time on projects. It allows workers to focus on their tasks without worrying about their footing. Whether you’re working on a small home project or a large building, knowing how to make scaffolding is invaluable. This knowledge enhances safety and productivity, making construction tasks easier and safer for everyone involved.
Materials Needed
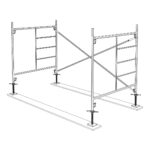
Creating scaffolding involves gathering essential materials. Steel pipes form the framework and ensure sturdiness. Couplers securely connect these pipes. Base plates provide stability, while wooden or metal planks offer a safe working platform. Safety harnesses and helmets are crucial for worker protection.
When you’re ready to tackle a scaffolding project, gathering the right materials is crucial. Ensuring you have everything on hand will make the process smoother and safer. Let’s break down what you’ll need, starting with the essential tools and equipment.Tools And Equipment
To get started with building scaffolding, you’ll need a solid set of tools and equipment. Here are the basics:- Measuring tape: Precision is key, so a reliable measuring tape is a must.
- Wrenches: Adjustable wrenches will help you tighten bolts and screws securely.
- Level: A sturdy level ensures your scaffolding is even and safe.
- Hammer: Useful for securing connections and minor adjustments.
- Screwdriver: Essential for fastening screws and bolts.
- Safety gear: Don’t forget your helmet, gloves, and harness for personal safety.
Types Of Scaffolding
Not all scaffolding is created equal, and it’s important to choose the right type for your project. Here are some common types you might consider:- Supported Scaffolding: This is the most common type, often used in construction. It consists of platforms supported by rigid, load-bearing members.
- Suspended Scaffolding: These are platforms suspended by ropes or other non-rigid means, ideal for working on tall buildings.
- Rolling Scaffolding: Equipped with wheels, this type allows for easy movement and is perfect for jobs that require mobility.
- Trestle Scaffolding: Commonly used for indoor work, it consists of a working platform supported on movable ladders or tripods.

Credit: www.wikihow.com
Preparing The Site
Begin by clearing the area of any debris and obstacles. Ensure the ground is level and firm for stability. Mark the site boundaries clearly to avoid accidents.
Preparing the site for scaffolding is a crucial first step that ensures safety and efficiency. It’s like setting the stage for a play. Everything needs to be in place to support the performance. A well-prepared site minimizes risks and sets the tone for a smooth construction process. But how do you go about it? Let’s break it down into manageable steps to make your project a success.Site Inspection
Before you start building, you need to know the lay of the land. Walk around the area where the scaffolding will be erected. Look for any obstacles that might interfere with the setup, like uneven ground or nearby structures. Ask yourself: Is there enough space for the scaffolding? Are there power lines or tree branches that need attention? Identifying potential issues early prevents costly delays later on. Check for any underground utilities that might be affected. You wouldn’t want to dig into a water line or electrical cable. Use utility maps if available, and consider consulting with local authorities.Ground Preparation
A stable foundation is key to a safe scaffolding setup. Start by clearing the site of debris, rocks, and vegetation. A clean surface makes it easier to spot any irregularities. Level the ground as much as possible. If the site is on a slope, you may need to dig or fill to achieve a flat surface. This ensures even weight distribution and prevents tipping. Consider adding base plates or mudsills to distribute the load. These provide extra stability, especially on soft or wet ground. Think of them as the scaffolding’s sturdy shoes, ready to tackle any terrain. Getting the site ready might seem like a lot of work, but it’s essential for safety. Would you rather spend a few extra hours preparing or risk an accident later? Your foresight and attention to detail will pay off as the project progresses.Assembling The Base
Assembling the base of a scaffolding is crucial. It ensures stability and safety. This process involves several steps. The first step is positioning the base plates. After that, securing the foundation is essential. Let’s explore these steps in detail.
Positioning Base Plates
Begin by laying out the base plates. They should be on a level surface. Arrange them according to your scaffolding design. Each base plate must be placed firmly. This prevents shifting and tilting.
Check the ground. Ensure it is compact and stable. Avoid placing base plates on soft soil. If needed, use a solid base under the plates. This could be plywood or another firm material.
Securing The Foundation
After positioning the base plates, secure them. Use adjustable screws or pins. Tighten each screw firmly. This step prevents movement. It also ensures the scaffolding remains level.
Inspect the base regularly. Look for any signs of instability. Make adjustments as necessary. A solid foundation is key. It supports the entire structure.
Remember, a well-secured base ensures safety. Take your time during this step. It is the foundation of your scaffolding.
Building The Frame
Building the frame of a scaffold is crucial for stability. It provides the necessary support for your scaffolding structure. This step involves setting up vertical supports and attaching horizontal braces. Each part must be carefully aligned and secured. A well-built frame ensures safety and efficiency during construction tasks.
Erecting Vertical Supports
Start by placing the base plates on the ground. Ensure they are level and stable. Insert the vertical tubes into the base plates. These tubes form the backbone of your scaffold. Secure each tube firmly to prevent wobbling. Check the alignment using a spirit level. Adjust as necessary to keep the structure straight. Properly erected vertical supports provide the framework’s strength.
Attaching Horizontal Braces
Next, connect the horizontal braces to the vertical supports. Use coupling pins to join them. The horizontal braces stabilize the vertical supports. Place the braces at regular intervals for uniformity. Ensure each brace is tightly secured. This prevents any movement and adds strength. Double-check all connections for safety. A well-braced frame is essential for safe scaffolding use.
Installing Platforms
Installing platforms on scaffolding is a critical step that demands precision and safety. The platforms serve as your workspace, and ensuring they’re set up correctly is essential for both functionality and safety. Let’s dive into the specifics of placing and securing these platforms, so you can work confidently and efficiently.
Placing Planks
When placing planks, it’s important to choose sturdy materials. Opt for planks that are specifically designed for scaffolding. They should be strong enough to support weight and resist bending.
Ensure that the planks are placed evenly across the scaffolding structure. This prevents any wobbling or instability. You might find it helpful to measure the distance between planks to maintain uniformity.
Have you ever wondered why some scaffolding setups seem more stable than others? The secret often lies in the meticulous placement of planks. Make sure they fit snugly into the designated slots without leaving gaps.
Securing Platforms
Securing platforms is about ensuring safety. Use clamps or locks to hold the planks firmly in place. This helps prevent slipping, especially in windy conditions.
Consider using safety nets or guardrails. These additional measures can provide extra security, ensuring that tools or materials don’t accidentally fall off the edge.
Have you ever noticed how some scaffolding seems to withstand the test of time? This durability often stems from proper securing techniques. Double-check each plank’s stability before stepping onto the platform.
Installing platforms correctly not only safeguards your work but also enhances productivity. Taking the time to secure each plank properly can save you from unexpected mishaps. How confident are you in your current scaffolding setup? Perhaps it’s time to reassess and ensure everything is in perfect order.
Credit: blog.shockbyte.com
Adding Guardrails
Guardrails enhance scaffolding safety by preventing falls. Secure guardrails at the scaffold’s edges and work platforms. This ensures a stable and safe working environment.
Adding guardrails to your scaffolding is a crucial step for ensuring safety. It’s not just a recommendation; it’s a must-do action to prevent accidents. Imagine working high above the ground without a safety net—guardrails are that safety net. They offer stability and peace of mind, allowing you to focus on the task at hand. Let’s dive into the essential steps to set up your guardrails correctly.Setting Up Guardrails
Begin by assessing the height and length of your scaffolding. This will determine how many guardrail panels you need. Each panel should be sturdy and fit securely into place. Attach the guardrails on all open sides of the scaffold. Make sure they are at an appropriate height, typically between 39 and 45 inches above the platform. This height helps prevent falls without obstructing your work. Don’t forget to secure the guardrails tightly. Loose rails can be more dangerous than no rails at all. Double-check all connections before stepping onto the scaffold.Installing Toe Boards
Toe boards are the unsung heroes of scaffolding. They prevent tools and materials from falling off the platform, which is crucial for the safety of those working below. Start by measuring the length of each side of the scaffold where a toe board will be placed. Cut the boards to fit the entire length. Make sure they are snug against the platform. Secure the toe boards at the base of the guardrails. This ensures they stay in place even if bumped. Use strong fasteners and double-check their stability. Have you ever dropped a tool from height? It’s nerve-wracking. Toe boards can save you from such incidents, keeping everyone safe. Remember, a safer work environment isn’t just about rules; it’s about respecting each other’s well-being. Adding guardrails and toe boards may seem like a small task, but they make a world of difference. Are there any other safety measures you think are crucial for scaffolding? Let us know your thoughts in the comments!Final Safety Checks
Ensure scaffolding is secure with thorough final safety checks. Inspect all connections, platforms, and guardrails. Verify stability and load capacity to prevent accidents.
Ensuring the safety of scaffolding is crucial before any work begins. Final safety checks serve as the last line of defense against accidents and mishaps. They might seem tedious, but they’re indispensable for a secure working environment. By prioritizing these checks, you protect yourself and others from potential hazards. Imagine the peace of mind knowing that your scaffolding is stable and compliant with safety standards.Inspecting Stability
Before stepping onto the scaffolding, take a moment to inspect its stability. Ensure that all connections are secure and that the scaffolding is firmly anchored. Check the ground or surface it rests on; it should be level and solid. If you notice any movement or wobbling, address it immediately. Regular inspections can prevent accidents. Consider setting a routine for these checks. Inspect daily or before each use. A personal experience taught me the value of this habit when a loose connection almost led to a fall. Don’t wait for a scare to make this a priority.Ensuring Compliance
Compliance with safety standards is not just a regulatory requirement—it’s a lifesaver. Familiarize yourself with the local safety regulations governing scaffolding. Are there specific guidelines for height, weight limits, or materials? Make a checklist of these requirements and verify each one. This checklist can serve as a quick reference before each use. Have you ever faced penalties for non-compliance? Avoid such issues by double-checking everything. Compliance protects not only the workers but also the entire project from costly delays. To make this process easier, involve your team. Share the checklist and encourage everyone to participate in these safety checks. Team involvement creates a culture of safety. How can you ensure everyone understands the importance of compliance? Consider holding brief safety meetings where issues can be discussed and resolved. By focusing on these final safety checks, you ensure that scaffolding is not only a temporary structure but a safe platform for productivity. What strategies will you implement to enhance your safety checks?
Credit: www.youtube.com
Frequently Asked Questions
How Do You Build A Scaffold Step By Step?
To build a scaffold, first, inspect the area and ground. Assemble the base plates and frames. Attach braces securely. Add platforms and guardrails. Inspect for stability and safety.
What Is The 3 To 1 Rule For Scaffolding?
The 3 to 1 rule for scaffolding means the height should not exceed three times the base’s smallest dimension. This ensures stability and safety.
What Are The Three 3 Types Of Scaffolding?
The three types of scaffolding are supported scaffolding, suspended scaffolding, and rolling scaffolding. Supported scaffolding is built from the ground up. Suspended scaffolding hangs from ropes or cables. Rolling scaffolding has wheels for easy movement. Each type serves specific construction needs, ensuring safety and efficiency.
What Do You Need To Make Scaffolding?
To make scaffolding, you need steel or aluminum tubes, couplers, base plates, and wooden planks. Safety gear is essential.
Conclusion
Building scaffolding requires care and attention. Safety is the priority. Use proper materials and follow guidelines. Double-check connections and stability. Ensure all parts fit securely. Regularly inspect your work for any issues. Mistakes can lead to accidents. Practice makes perfect, so take your time.
Learning the basics helps in achieving a safe setup. Scaffolding supports your projects efficiently when done correctly. With patience and precision, you can create sturdy scaffolds. Always prioritize safety, and your efforts will pay off. It’s about building safely and effectively.
Keep improving with each scaffold you make.