Making scaffolding may seem complex, but it can be simple. With the right steps, you can do it safely and effectively.
Scaffolding is essential for many construction and repair projects. It provides a stable platform for workers and materials. Knowing how to build it correctly ensures safety and efficiency. In this guide, we will walk you through the process of making scaffolding.
From gathering materials to assembling the structure, every step will be covered. This will help you understand the basics and build a sturdy scaffold. So, let’s start with the essentials and ensure your project is safe and successful.
Introduction To Scaffolding
Scaffolding is essential in construction. It provides a temporary structure. Workers use it to reach high places safely. Scaffolding supports workers and materials during building processes. Understanding scaffolding is key for any construction project.
Purpose Of Scaffolding
Scaffolding ensures safety and efficiency. It allows workers to access difficult areas. It also supports tools and materials. Scaffolding reduces the risk of accidents. Proper scaffolding helps complete projects on time.
Types Of Scaffolding
There are several types of scaffolding. Supported scaffolding is the most common. It is built from the ground up. Suspended scaffolding hangs from the top of a structure. It is useful for tall buildings. Rolling scaffolding is mobile. It can be moved around easily. Each type serves different purposes. Choose the right one for your project.

Credit: www.wikihow.com
Safety Precautions
Ensure stability by using proper base plates for scaffolding. Check for secure connections and fastenings. Wear safety gear at all times.
When it comes to scaffolding, safety is paramount. Whether you’re a seasoned professional or a DIY enthusiast, understanding and implementing safety precautions can prevent accidents and ensure a smooth workflow. Even a small oversight can lead to significant risks, so let’s delve into the essential safety measures you need to consider while working with scaffolding.Protective Gear
Wearing the right protective gear is crucial. Hard hats protect you from falling objects, a common hazard on construction sites. Steel-toed boots provide stability and protect your feet from heavy equipment. Harnesses are a must when working at height. They provide essential support and can prevent serious injuries in case of a fall. Gloves can enhance your grip and protect your hands from sharp edges and splinters. Remember, your gear is only effective if it’s in good condition. Regularly inspect your gear for signs of wear and tear. Would you trust a frayed harness with your life?Site Assessment
Before you even set up the scaffolding, assessing the site is key. Look for uneven ground, as this can cause instability. Ensure the surface can support the weight of the scaffolding and any additional load. Identify potential hazards such as overhead power lines. These can be deadly if contacted, so scaffolding should be positioned a safe distance away. Also, consider weather conditions. Wind and rain can impact scaffolding stability and worker safety. Make a checklist of these factors. Engage your team in this process. This ensures everyone is aware of potential dangers and can work together to mitigate them. Safety isn’t an afterthought; it’s a continuous process. By prioritizing protective gear and thorough site assessment, you’re taking significant steps towards a secure scaffolding experience. What other precautions have you found crucial in your experience?Materials And Tools
Building scaffolding requires the right materials and tools. Using the correct components ensures safety and stability. Let’s explore what you need to get started.
Essential Materials
First, gather essential materials. These include metal tubes, wooden planks, and base plates. Metal tubes form the scaffolding’s frame. Wooden planks provide the working platform. Base plates stabilize the structure on the ground. Safety netting and guardrails offer protection. Bolts and clamps hold everything together.
Tool Checklist
Next, assemble your tools. You need a wrench to tighten bolts and clamps. A tape measure ensures precise measurements. Use a level to check alignment. A hammer helps with adjustments. Gloves protect your hands. Safety harnesses prevent falls. A ladder is essential for reaching higher levels. A scaffolding key is useful for locking and unlocking components.
Preparing The Site
Preparing the site is essential for safe scaffolding. Clear the area of debris and obstacles. Ensure the ground is stable and level. These steps prevent accidents and make building scaffolding easier.
Preparing the site for scaffolding is crucial for ensuring safety and efficiency during construction or renovation projects. A well-prepared site minimizes risks and lays a solid foundation for your scaffolding structure. Without proper preparation, you might encounter unnecessary challenges that could delay your project or even pose safety hazards. So, how can you effectively prepare your site for scaffolding? ###Clearing The Area
Start by removing any obstacles from the site. This includes debris, equipment, or vegetation that might be in the way. A clear area not only provides a safe working environment but also ensures that the scaffolding is erected on a stable surface. I once had a project where we underestimated the importance of this step and faced constant disruptions due to leftover materials cluttering the space. Walk through the site and identify anything that might interfere with the scaffolding. This could be tools left on the ground or uneven patches of soil. Address these issues promptly to maintain a smooth workflow. Do you have a checklist for this step? It can be as simple as listing potential obstacles and ticking them off as you clear them. ###Marking Boundaries
Once the area is clear, it’s time to mark the boundaries for your scaffolding. Use chalk lines, stakes, or any visible markers to outline where the scaffolding will be placed. This helps in visualizing the layout and ensures that everyone on the team is on the same page. I remember a colleague marking boundaries with bright tape, making it easier for everyone to stay within the designated area. Accurate boundary marking prevents the scaffolding from encroaching on other work areas or public spaces. It also helps in planning the number of scaffolding sections needed. Have you considered using a laser level? They can be a game-changer for precise measurements. Ask yourself if there are any potential obstacles that might affect the boundaries. Nearby structures, for instance, might require adjustments in your original plan. Address these considerations early to avoid last-minute changes. By focusing on clearing the area and marking boundaries effectively, you set the stage for a smooth scaffolding process. How do you ensure your site preparation is thorough? Are there steps you take that others might overlook?Building The Base
Building the base of scaffolding is crucial for safety and stability. A strong foundation ensures the structure supports weight and resists tipping. Proper setup from the start prevents accidents and enhances work efficiency. Here, we explore essential steps to build a solid scaffolding base.
Setting Up Foundations
Start by choosing firm, level ground for the scaffolding. Uneven surfaces can cause instability. Clear any debris or obstacles in the area. Place wooden planks or base plates to distribute weight evenly. These components protect the ground and add stability. Ensure the base plates or footings are secure.
Leveling The Base
Use a spirit level to check the base’s evenness. Adjust as necessary to achieve a level surface. This step prevents leaning, which can lead to dangerous conditions. If needed, use adjustable jacks or screw jacks for fine-tuning. Consistent leveling ensures scaffolding remains steady under load.
Regularly inspect the base for any shifts or changes. Environmental factors can alter the ground over time. Keeping the base stable is key for safe and effective scaffolding use.

Credit: www.youtube.com
Assembling The Frame
Assembling the frame of your scaffolding is a crucial step that demands attention to detail and precision. It’s the backbone of your structure, ensuring safety and functionality for your project. Whether you’re a seasoned builder or a DIY enthusiast, mastering this process can make all the difference. You don’t want to risk a shaky start, right? So let’s dive into how you can assemble your scaffolding frame effectively.
Connecting Components
Start by laying out all your components, such as tubes, clamps, and fittings. This preparation saves time and prevents unnecessary trips to the store. Think of it like gathering ingredients before cooking; it just makes the entire process smoother.
Begin by attaching the vertical tubes to the base plates. Make sure each connection is tight and secure. Loose joints can lead to instability, which nobody wants.
As you connect horizontal tubes, check for alignment. Misaligned parts can cause structural issues later. This step might take some patience, but it’s worth every second.
Ensuring Stability
Stability is non-negotiable. Double-check each joint as you go. A small oversight can escalate into a big problem when your scaffolding is loaded.
Consider adding cross-braces for extra support. These diagonal supports can significantly enhance the strength of your frame. Would you rather be safe than sorry?
If working on uneven ground, use adjustable base plates. They help level the scaffolding, reducing wobble. It’s like giving your frame a sturdy pair of shoes.
Remember, a well-assembled frame is the foundation of your scaffolding project. Each connection and brace plays a critical role. Don’t rush the process; take pride in each step. Your efforts will pay off when your scaffolding stands firm, ready for whatever task you have in mind. So, are you ready to build with confidence?
Installing Platforms
Installing platforms is a crucial step in scaffolding. It provides a stable surface for workers and materials. Proper installation ensures safety and efficiency. This guide covers the essential steps to install platforms correctly.
Placing Boards
Start by selecting sturdy, flat boards. They should fit snugly across the scaffolding frame. Avoid gaps between boards for safety. Arrange boards in a straight line. Ensure they overlap slightly for added strength. This prevents shifting when weight is applied.
Securing Platforms
Once boards are in place, secure them. Use clamps or screws designed for scaffolding. Tighten each fastener firmly. Double-check the security of each connection. Ensure no movement or wobbling occurs. Properly secured platforms provide a safe work environment.

Credit: m.youtube.com
Final Checks
Final checks ensure scaffolding is safe and secure. Inspect every connection and joint thoroughly. Confirm all safety measures are in place.
When you’re wrapping up any scaffolding project, the final checks are crucial. They are the key to ensuring safety and efficiency. These checks not only guarantee a solid foundation but also offer peace of mind. You wouldn’t want to risk safety due to overlooked details.Inspection Process
The inspection process begins with a thorough visual check. Look for any loose bolts or damaged parts. Test the stability by gently shaking the structure. This helps identify weak points. Don’t rush through this part. Your careful inspection can prevent accidents.Safety Confirmation
Safety confirmation is the final stamp of approval. Use a checklist to confirm each part is secure. Ensure all workers have the necessary safety gear. Hard hats, gloves, and harnesses should be mandatory. Imagine the relief knowing you have double-checked everything. Would you trust a structure without a final safety check? Remember, these final checks are not just a formality. They’re your assurance that the scaffolding is safe and ready for use.Maintenance Tips
Regular maintenance ensures scaffolding remains safe and durable. Proper care prevents accidents and prolongs usage. Follow these tips to keep your scaffolding in top condition.
Regular Inspections
Inspect scaffolding before and after each use. Look for loose bolts or screws. Check for rust or corrosion on metal parts. Ensure planks and platforms are secure. Use a checklist to cover all safety points. Document findings for record-keeping.
Repair Guidelines
Fix minor issues immediately. Replace damaged parts promptly. Avoid makeshift repairs with unsuitable materials. Only use parts that meet safety standards. Consult a professional for complex repairs. This ensures safety and compliance.
Frequently Asked Questions
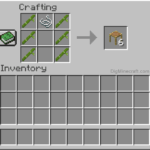
How To Craft Scaffolding In Minecraft?
To craft scaffolding in Minecraft, arrange 6 bamboo and 1 string in the crafting table. Place 3 bamboo vertically on each side and the string in the top-middle slot.
How To Build A Scaffold Step By Step?
1. Gather necessary tools and materials. 2. Inspect the area for hazards. 3. Assemble the base securely. 4. Build the scaffold frame layer by layer. 5. Ensure all parts are locked and stable. 6. Add platforms and guardrails for safety.
7. Conduct a final safety check.
What Is The 3 To 1 Rule For Scaffolding?
The 3 to 1 rule for scaffolding ensures stability by requiring the height not to exceed three times the base width. This prevents tipping and enhances safety during construction projects. Always check local regulations for specific requirements.
Can You Do Scaffolding Yourself?
No, scaffolding should be done by trained professionals. It ensures safety and compliance with regulations.
Conclusion
Building scaffolding requires patience and attention to detail. Always prioritize safety first. Use quality materials to ensure stability. Follow guidelines strictly to avoid accidents. Proper scaffolding enables efficient work at heights. Regularly inspect and maintain the structure. With practice, you will improve your skills.
Remember, well-made scaffolding supports successful projects. Happy building!